A Reflective Blog Post

At the beginning of this course, I thought about engineering writing mostly as a final product. In my mind, the engineer did the experiment, ran the calculation, built the model, tested the part, and then wrote everything down afterward. Writing mattered only insofar as it permitted documentation. However, after working through the various writing projects in this course, touching on various engineering and scientific topics, I’ve come to see engineering writing differently. Writing is not just how engineers report decisions. It is one of the ways engineers make decisions, explain uncertainty, build credibility, and help other people use technical information responsibly.
I think that shift is the clearest thread connecting my portfolio. In Project 1: Learning to Write Like a Materials Researcher, began this exploration of engineering writing by reflecting on my Spring 2025 internship at Pacific Northwest National Laboratory, and the research report I wrote about self-reinforced PPS composites. Then, in Project 2: How to Write an Engineering Technical Guide I tried to generalize the knowledge I learned from writing that research paper–as well as from researching other guides on engineering writing–to produce a practical (although rudimentary) guide for writing usable engineering documentation. Then, in Project 3: From Calculations to Decisions, I expanded that work into a broader style guide for mechanical engineering writing. Together, I think these pieces of writing well capture how my understanding of what constitutes effective engineering has evolved. If I had to summarize it, I’ve come to believe that writing is part of the process of doing engineering work, not just something that explains it.
Looking back, I think the broader change in my thinking is reflected in how I revised each of my three major projects. Although each project required different kinds of changes, my revisions generally moved the writing away from simply presenting information and toward helping a particular audience understand and use it.
Project 1, the analytic narrative, changed the most in terms of reflection. My first draft already had a strong central idea: while writing my PNNL research report, I realized that writing is part of the research process itself. However, several features of the draft were lacking, with the biggest being my tendency to gloss over technical material. Because I was already familiar with the project, I took for granted that readers would understand terms and ideas such as polyphenylene sulfide, self-reinforcement, injection over-molding, and trial and error. I didn’t stop to think of some of the questions that would naturally arise in a reader’s mind, such as, “What is PPS?” and “What did trial and error look like in your writing process?” I also neglected to explain how I learned what the materials-science research community expected from a report rather than simply stating that those expectations existed.
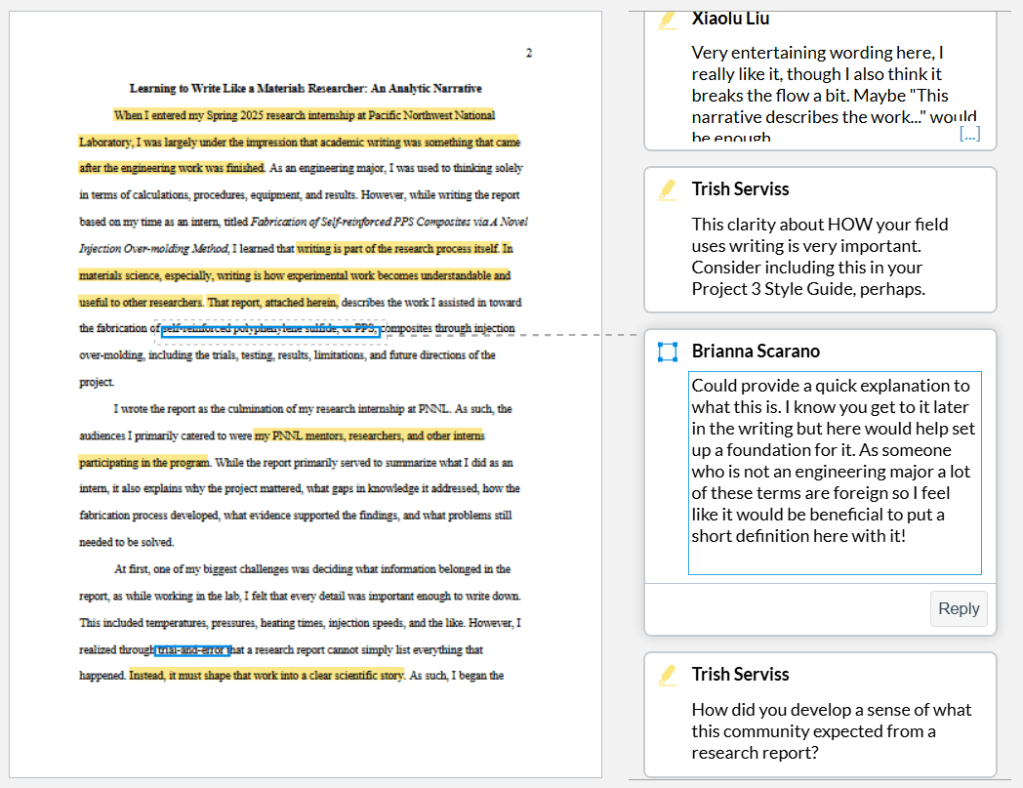
In subsequent drafts, I tried to put this feedback to good use by adding more background about polyphenylene sulfide, or PPS, and more deeply explaining the project’s larger purpose in more accessible language. For example, instead of simply presenting the research as an attempt to make a stronger material, I clarified that we were studying what might happen when both the reinforcing fibers and the surrounding resin were made from PPS. A chemically similar fiber and matrix could potentially affect mechanical performance, recyclability, thermal expansion, etc. I felt that adding this context would help readers outside materials science understand why the project mattered before I described the experimental details.
Most importantly, I also wanted to make the trial-and-error process I went through more concrete. In the first draft, I only briefly stated that some experiments failed and that failure was part of research. In the revision, I expanded this thought by explaining what those failures actually looked like. I then connected those laboratory decisions to my development as a writer, a connection that was left unexplored prior; I explained how my early writing followed the experiments chronologically, almost like a laboratory notebook: first we tried one setting, then something went wrong, and then we tried another. Through feedback, mentor questions, and repeated revision, I learned that a research report must do more than preserve that sequence. It must explain which details matter, why a change was made, and what each result suggests.
Project 1 was also the most helpful in getting me to fully appreciate and understand the role of visuals as evidence. Originally, I only gave brief mention of the figures in the report I was referencing that helped to illustrate my findings. Further down the like, I identified the specific visuals I’d utilized in the report to show my findings: the process diagram of the automatic injection-molding system, photographs of the mold and equipment, images of the water-jet-cut dogbone specimens, tensile stress-strain graphs, a results table, and photographs of fractured specimens. I also explained the purpose of each of these visuals. For example, I explained how the process images documented how the composites were fabricated, while the graph and table allowed readers to compare the reinforced specimens with pure PPS. I also explored how the fractured-specimen photographs showed physical evidence of what happened during testing, something I’d only alluded to prior. In doing all this, I think my analysis became more specific and demonstrated that engineering figures are useful in that they connect procedures to results and help readers judge whether the evidence supports the conclusion.
Project 2 developed differently because most of my initial struggles with writing the how-to guide focused on issues of usability. My first draft was already organized as a comprehensive and practical guide for engineering students, interns, entry-level professionals, etc. However, for being a beginner how-to guide, it was frankly lacking in real-world examples, defining unfamiliar terms, and making dense sections easier for beginners to scan.
To address these shortcomings, I focused on increasing readability by adding sample scope statements, clearer comparisons between effective and ineffective warnings, measurable verification steps, and a short example procedure showing how the guide’s advice works in practice. I also tried to more carefully define technical terms. I also wanted to improve the visual layout of the piece by utilizing stronger headings, shorter sections, and more white space. My goal was to make the guide more concrete and accessible without losing the concise, practical format that worked well in the original draft.

Project 3, my mechanical engineering style guide, pushed this focus on practical communication even further. The first draft for this project was arguably my strongest one yet, employing clear headings, accessible language, tables, examples, etc. At the same time, there were still several visible areas for improvement, namely around adding a more thorough discussion of the different engineering genres and providing a more robust conclusion that would help beginners remember and apply the main points of the guide.
To increase memorability, applicability, and overall breadth of discussion, I shortened repetitive sections and made the guide more consistent by adding another genre (presentations and posters) to the genre table and explaining some of the requirements for this genre like concise claims, readable graphics, and greater visual emphasis. I also added sections on common mistakes and tips for new engineering writers. to address common problems in engineering analysis such as presenting calculations without context, leaving assumptions unstated, overstating results which aren’t supported by said calculations, etc. I thought this was a strong addition since it also encourages writers to identify the reader’s needs, use specific examples, and revise in separate passes. Finally, I added a practical checklist and a conclusion that restate the guide’s central point.
| Engineering genre | Main purpose | Likely audience | Most important features |
| Research paper | Present original findings | Researchers and specialists | Methods, evidence, uncertainty, contribution |
| Technical report | Document an investigation or project | Engineers, managers, clients, regulators | Scope, procedures, results, conclusions |
| Design memorandum | Support a design decision | Project team or supervisor | Requirements, alternatives, calculations, trade-offs |
| Procedure or guide | Help someone complete a task | Operators, students, technicians | Ordered steps, warnings, diagrams, verification |
| Proposal | Obtain approval, funding, or resources | Managers, clients, sponsors | Need, objectives, plan, feasibility, cost |
The weekly blog posts also shaped these projects. In Designing the Future Before We Build It, I wrote about computational materials discovery and how tools such as AI, simulations, and materials databases are changing the way researchers search for new materials. Looking back, that post really helped me practice explaining technical ideas to a general audience without removing the complexity completely, something which I’ve struggled to strike a balance with prior. Later, in Can Self-Driving Science Be Trusted?, I focused on reliability, uncertainty, and the importance of human judgment in autonomous labs. After the revisions mentioned prior, I feel that post more closely connects to my (revised) style guide wherein both pieces arrive at the same conclusion: technical work needs transparency before it can be trusted.
My website review of the Acceleration Consortium also stood out. I don’t think I’ve ever been a particularly great reviewer. However, I think I provided a comprehensive and balance evaluation of how the organization communicates the promise of self-driving labs to public and technical audiences. I think my most powerful point of insight came in noting that, while the website was visually engaging and accessible, it leaned more toward sensationalism than caution and realism. That assignment taught me that communication about emerging technology has consequences, which I think is reflective of my main takeaway. If writing only emphasizes excitement, readers may miss the limitations, costs, uncertainties, or risks. Most importantly, though, this idea continued into my later projects, especially when I wrote about honest uncertainty in engineering writing.
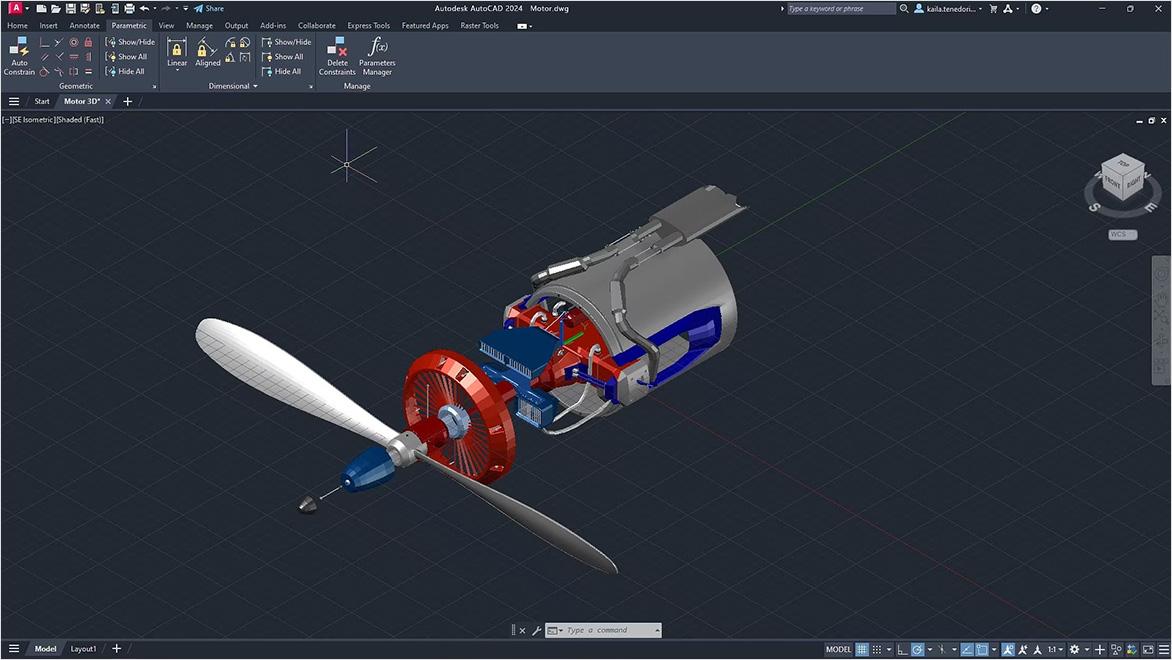
The multimodal communication post was another important turning point in how I engaged with engineering writing. Prior to this assignment, I largely viewed technical writing mostly as words on a page–i.e. it was the dense volume of unfiltered information that makes a piece of writing “technical”. However, exploring images, videos, diagrams, and sound files in the process of writing this post helped me see that engineering communication is almost always multimodal, and it’s better for it. After all, a simple CAD image can often communicate information that multiple paragraphs alone cannot. That realization influenced the visuals section of my style guide. I now think a successful engineering writer needs to understand not only what to say, but which mode best communicates the information.
After completing these projects, I’d like to think that I’ve reassessed what the benchmark is of a successful writer in mechanical engineering. That is, a successful engineering writer defines terms, explains assumptions, supports claims with data, captions visuals carefully, among numerous other things. Just as importantly, however, they understand that different genres serve different purposes, and they know how to best adopt and utilize these genres to communicate technical and scientific information to a variable audience.
In this vein, I hope that a visitor to this portfolio learns that engineering writing is not just about sounding technical. In fact, one of the worst habits in technical writing is making simple ideas sound unnecessarily complicated, as I’ve learned the hard way. Instead, strong engineering writing should seek to make complex work easier to evaluate. I want this message to get across to undergraduate students and early-career professionals, especially, because many of us enter engineering thinking that calculations are the main proof of competence. However, communication is also an integral part of competence.
I also learned something about myself as a writer. One of my worse writing habits is that I tend to begin with a lot of information because I want to be thorough. While that has its place in engineering writing, this proclivity has a tendency to make the early drafts I produce way too dense. I’d like to think I’ve gotten better at managing this habit through the constant revisions and rounds of feedback I’ve received in updating my writing. I also learned to ask better revision questions: What does the reader need first? What can be moved later? What needs an example? What claim needs evidence?… This has helped me learn to revise at the level of purpose and audience instead of making simple grammatical corrections.
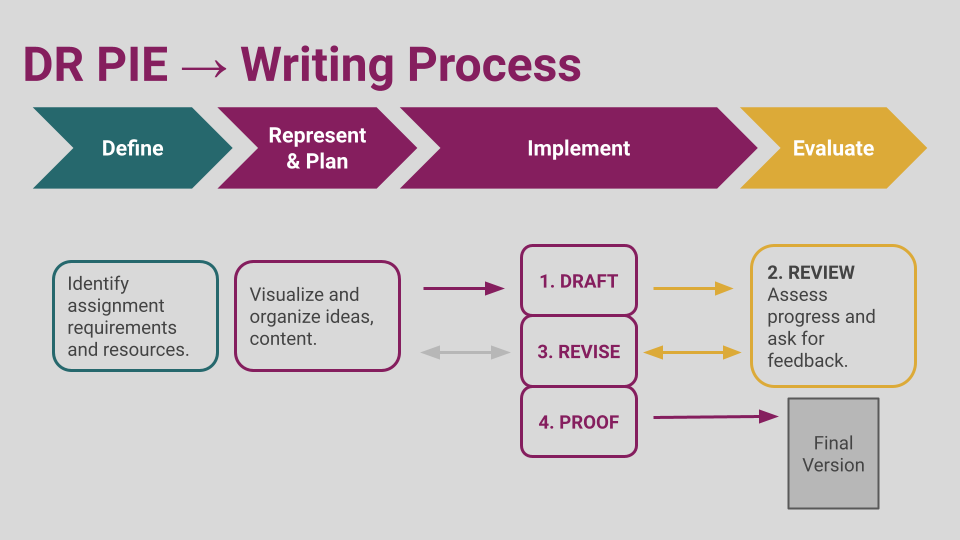
plan, implement, evaluate, draft, review, revise, and proof.
I’ve built a strong foundation for engineering writing through this course, which will help me in the future as both a student and working professional. As I move toward research in materials science and chemistry, I will need to write reports, emails, proposals, abstracts, posters, and possibly journal articles. I will also need to explain technical work to people with different levels of expertise. The projects in this course gave me a framework for doing that by teaching me to connect calculations to decisions, results to evidence, and to translate technical information for use by wider audiences.
 Ashton Petersen
Leave a comment